26 February 2018

A Similar But Very Different Card

I am sharing another Distress Oxide inked card today and a few tips about putting a card together when you just cant think!!! I was struggling to make a card I really needed to send to a friend, she is such a jolly person even in the face of such difficult times. She is also a card maker so I knew she would love something a little bit different. But my head was kinda foggy with stuff!
I knew I wanted a colourful pastel Distress Oxide inked background and to use a new Woodware flower stamp set but I struggled to think up how to put my card together. Sometimes it gets like that with me when I have a lot on my mind, or when I am struggling with pain, I just can't seem so think straight, and that causes even more stress! I suppose it's the same as writers block?


I am learning that at these times I should go back and look at previous cards that pleased me and use them as a starting point.  Remember the Stitched Poppies card I made in a previous post? I was really happy with that card so I used it to help me with the card layout. rather like working with a card sketch, choosing certain elements and repeating them and maybe changing them a little! to create a similar but very different card..... I must remember to do this again as it really helped me to get going and make this rather important card (below) for a friend!
First I created the background using watercolour paper, lots of water and my Distress Oxide ink pads. after adding water to the paper liberally with a brush I swooshed my ink pads onto my glass surface and used a paint brush to add the colour to the paper trying not to think too much but also wanting to leave some white space I blobbed the ink and watched it spread on the wet watercolour paper creating areas of pastel colour. Then after drying the paper with a heat tool, I dipped my hand into clean water and sprinkled over my inked piece and dried it again watching the awesome effects Of Distress Oxides doing their thing! I love this technique, its almost fool proof and no two pieces are exactly the same
I then used the wonky stitched rectangle die to cut a piece of it out as with the Stitched Poppies card. I stamped the image using wilted violet distress ink after making sure my background was totally dry.  I coloured the flower image using perfect pearls powder with a little water using a paintbrush. 
Then I copied the side panel but this time I gave it a pennant tail and ran it through a leafy embossing folder. I carefully dabbed a versamark ink pad onto the raised leaves and applied dry perfect pearls powder to it with a soft paint brush, this highlighted the embossed leaves beautifully. 
My card was coming together now. I had overcome that initial block and found my creative flow again! 
I didn't want to distract from that lovely background so the grupier lace wasn't gonna work this time, its a bit too heavy for a delicate card. So I created a delicate white border strip using a die from the Floral Thinlit dies set by Stampin' Up instead. A pink strip of card completed the card base. After assembling the card I stamped and cut the sentiment which is taken from a Stampendous stamp set and then finally added the pearls which echo the perfect pearl elements nicely.
I am entering my card into some challenges...
"Use your favourite distress inking techniques"
"Stamping (no Digi's)"

***Some of my photo's seem to make that fossilised amber (yellow) colour look a lot more intense than it actually is, I think it s because the photo was taken in bright sunshine!

This has been a good lesson for me, I made 2 very similar but very different cards, why do I always want to reinvent the wheel? I am gonna type this out and put it on my desk.... 
"If you just can't think what to do,
 go back to when it worked for you!"

08 February 2018

Stitched Poppies For You

After trying out some different inking effects with my Distress Oxide ink pads this week and being inspired by the Tim Holt'z fans over on Facebook, I was inspired by a card made by a group member. The card had a background which had really "made" the card. Previously I had been creating lots of vivid rainbow backgrounds and some pastel ones too. But this time after seeing that inspiring card I approached the background effect a little differently than usual by just using 2 colours. I simply used Fossilised Amber and Peeled Paint for this background. 
I used the swooshing method and water to create the background of the card and I was amazed to get this effect I surprised myself lol!  I am enjoying this Distress Oxide journey. Thank You Tim Holtz!
Yesterday was a "staying in" day, which gave me a good time to design (play!) with one of my newest stamps too...

This is my new Stitched Poppies stamp by Woodware, it was released  January 2018  I love the many stitched lines around the poppies which give a stitched effect as if someone has sewn the poppies. I did however cut off from the stamp those grungy edges though! eeeeek yes I said CUT!!! but I saved all the pieces in case I want to use them in future. I did this because I didn't want them stamped in black on my card. That would have been too dark for me as I wasn't trying to achieve a grunge effect. Also, they limit the use of the stamp... without those grungy borders I can use a square or circle die to cut the image out too.

I really like the effect of stitching on cards and mixed media. There's lots of dies available now with a faux stitching edge. I used to add faux stitches by drawing them with a fine line black pen but the new dies are so much easier to use. For my card I used my wonky stitched rectangle dies to cut the image out and then tried to highlight the stitched lines with a black fine line pen. My eyes are not that good and failed me in places but I managed to get the effect I was looking for which has pleased me. But I think I will leave the stitching to the work of the  dies in future! trouble is once I had started I had to complete it!.
I am entering this card into a few challenges
"Favourite way to add stitching (faux, real, drawn) and why"
favourite way to add stitching is with dies just because it's so much easier

Crafty Card Makers challenge

"Get Inky / Messy"
Yes I did have a play with my Distress Oxide Inks!
"Anything Goes + a Stamp"
This Stitched Poppies stamp is the star of this card!
"Anything With Flowers"
Definitely 3 Beautiful flowers
"Anything But Cute"
No, this is not a cute card but I do love it!

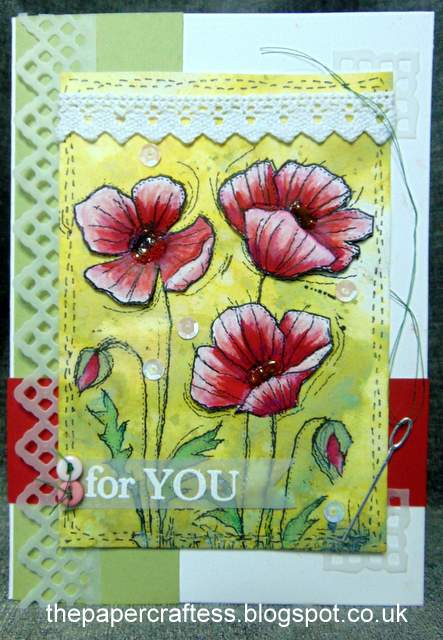
I stamped the image again and coloured the poppy flowers using my watercolour pencils. Then I cut them out and shaped them so that I could layer them 3d style, I added Nuvo Jewel Drops to accent the centres. The leaves were coloured using Peeled Paint oxide ink and an almost dry brush. 
I used pieces of sage green and red card to add layers behind the image and cut  a velum lattice strip and 2 corners using my spellbinders lattice die set. I added some guipure to the top of my stamped image sticking the image down with foam sticky tape.

I made a little pennant from style banner from velum then stamped and white embossed it with "for you" sentiment
Finally to accent I added some cotton thread and a die cut sewing needle (Tattered Lace die) to give the illusion of hand sewing again and 2 little buttons on the sentiment banner and a few twinkly sequins.
I have a number of friends who are fabulous needle workers, whether machine or by hand or cross stitch, This stamp will be so useful to make cards for them too.

thanks for looking have a great week!


03 February 2018

Love is... Always & Forever

Today's card is all about the stuff I love...the joy of creativity, colours, teddy bears, rubber stamping, colouring, even a bit of Distress Oxide ink blending and of course love love love! It's about the whole process of getting lost in my creative grove and finding I am not lost at all! I found myself... what Joy! Before I share some details about how I put this card together I will just mention the challenges I am entering this card into...
#426 Word Week "LOVE"
Anything Goes / Use Your scraps
"Anything Goes"
#C4C420  "Add a Heart"
"Anything But A Birthday"
"Love is in the Air"
"Valentine - Love  Use Red on the Card"

Another reason why this image really makes me smile is that it reminds me of a bench at Fairhaven Lake. Kev and I visit this bench a lot. We sit there, we talk, we pray, we pour out our hearts to each other and to our God, at times we sit silently just taking in the awesomer view and tranquil peace, We watch the birds and the sea, and in the summer months if we timed it correctly we would be wowed with an awesome glowing sunset at the end of a lovely day it is our sweet spot and it seems these teddies have a sweet spot of their own!
Ok so onto the card... The card base is a white 5"x7" card blank onto which I have matted with red card then gingham patterned paper. The next detail was a happy accident! I intended to have that lemon flowery scrap of patterned paper on the left hand side of the card but found when I had already adhered it that the card was upside down! I was quite upset with myself but soon came round to liking it on the right side of the card instead! That was all the plan I knew for this card at that time except I knew which stamp I wanted to use (see details below).
I stamped my image Then coloured it using my watercolour pencils.  I sponged that sunset sky using Fossilised Amber and Abandoned Coral Distress Oxide inks, After die cutting the image and its red mat using two sizes of dies from the S U labels collection framelits. I pierced all around the edges using a set of coordinating piercing templates.. I created a grey scalloped strip to stretch across the card after I added 2 scraps of teeny tiny heart paper to it. The sentiment was made on my computer . The key and heart lock die cuts are cut from the signature collection by Sara Davies (Crafters Companion) this dies set iscalled "The Key to My Heart" I stuck the die cuts on with sticky pads. The white bakers twine bow and knot gives the illusion that the heart lock and key are tied onto the card.
I really wanted to use the sentiment I recently bought which says Always & Forever" but it was too big for the front of the card. It's such a special sentiment to us because when we got married we walked down the aisle out of the church together to the song "Always & Forever" by Heatwave. I was so pleased to find the Signature collection die by Sara Davies I used it in the end on the inside of the card! That little heart is the cut out from the centre of the key!
I really really love these teddy bears.  its another of my stamps that gives me the warm fuzzies and all the romantic swooning I can cope with in one day!.. Rambling Ted and Rambling Rosie are my all time favourite teddy bear images and favourite Penny Black stamps that's really saying something as Penny Black are one of the best stamp companies out there!
The Rambling Ted and Rambling Rose images are created by Michael Woodward Designs and produced by Penny Black Inc. as rubber stamps. I have a number of these stamps in my collection. The stamp used here is titled "When I'm With You, its item number is 352K my Kev ordered this stamp and some others from the USA around seven years ago, but I think its much older.

Mens cards #2 DIY tools!

My 2nd mens cards mentioned in my last blog post was a little easier to plan. I knew I wanted to use the Stampin up "Nailed It" stamp set and co-ordinating "Build It" dies set. This this birthday boy is a DIY enthusiast! it was easieras I have used this set a few times now so I found it less challenging than card #1
I am entering this 2nd mens card into some challenges 
"Anything Goes"
"Anything Goes"
I had some fun making these little tools, they are very easy to do too. Each of the tools were stamped then cut out using the dies but can you see that ruler? the little screws and nuts? too cute! I just used silver metallic card for the metal bits and coloured card for the handles, (cutting each tool twice!) after stamping I coloured the handles then trimmed them to paper piece the handles onto the metallic die cuts. it was quite quick to do. 
The cream coloured card base is square, measuring just under 6"X6" That wood like background is created using craft card stamped with the hardwood background stamp. 
The side panel is created using the stamps in the "Nail It." stamp set, I used white card for this piece but really wish I had used cream card instead! If only we had hindsight in the beginning!  I am pleased with how it turned out this time and I know the birthday boy will like it

Mens Cards + CAS What a Challenge!

I am so challenged! The thought of making a card for a man does not thrill me at all. It's not that I don't want to bless the men around me, or celebrate their birthdays or special moments and achievements! men need all the blessed  encouragement they can get.
BUT honestly I find making cards for men quite hard. Well I needed to make 2 birthday cards for men this weekend, (I will share the 2nd card in the next post!)  I searched for inspiration on pinterest etc and decided perhaps I should buy the cards ***GASP*** "buy a card" !!???!!! I screamed inwardly at myself !!! NOOOOO that is not happening!! I got so frustrated as the ideas were simply not flowing so I left the task for a while and did something else (I am learning to walk away for a while rather than get frustrated!)  On returning to the need for cards yesterday afternoon, I noticed this sketch by the Tuesday Morning Sketch challenge.....   
This sketch is quite different to the sketches I usually follow. I liked it and the Design Team samples were lovely, but it brought up another challenge... I find CAS (Clean and simple) cards lovely to look at but when it comes to making them I get in the flow and just keep adding bits n bobs, details,  layers, embellishments, etc till my card is nothing like a clean and simple card. That's just me and my style I guess but hey I was up for the challenge. I needed to make this card so I had to have go! 
This particular birthday boys job is something to do with engineering and aeroplanes so that was a no brainer when it came to the theme. You could say I was off to a flying start LOL (sorry another pun) but I now knew which stamp set to use...The Sky is the Limit by Stampin' Up. now my inspiration had started to flow! His aeroplanes are very high tech compared to this vintage one but it has wings so that's good enough for me! 
I am entering this card into some challenges...
following the above sketch #438
"Things With Wings"

To create my card I used a white 5" x7" card base and pale grey card for the first layer to which I stamped and silver embossed the happy birthday stamp. Then chose pale blue marl mark card and stamped the tree tops from the Lovely as a Tree stamp set also from Stampin' Up.
I coloured the trees with watercolour pencils,  I used a whisper white ink pad and a dauber to add a bit of white for the clouds but it didn't show as nicely as I ped. I used my Tim Holtz Stamping platform to stamp the aeroplane image as I wanted to double stamp it to get a good dark crisp image. After colouring it I fussy cut it out along with some stamped clouds, mounted the aeroplane and one cloud onto foam pads and left the other clouds flat. 
When I finished my card I had to almost sit on my hands to stop myself adding to it but I am pleased I left it as it is.

That sketch really helped me to get this card going once I got into the flow the inspiration came and  it was job done!